|
Copy a range of cells in Excel (or other spreadsheet program) to the Windows Clipboard and then paste them into a Milestones Professional schedule.
Custom import requirements: Each record is expected to be on a line by itself and have the same field layout. Date fields must be formatted as mm/dd/yy (or m/dd/yy or m/dd/yyyy). When using a different separator, choose the format with two digits for each, e.g. dd.mm.yy.
Import using the Custom Import From Clipboard option:
-
Copy columns and rows of data to the clipboard.
-
In Milestones, choose Connections| Excel | Import/Update from Excel | Custom Import From Clipboard.
-
In the Import: Custom Format dialog box, select an existing filter and choose Retrieve Settings. Or, create a new import filter using the Create a new filter instructions below. Then continue with Step 4 below.
-
 Append Imported Data if the data on the clipboard should appear below existing data in the Milestones schedule. Otherwise, existing data will be overwritten. Append Imported Data if the data on the clipboard should appear below existing data in the Milestones schedule. Otherwise, existing data will be overwritten.
-
Click Continue Import Using Current Filter to import using the selected filter's column mapping.
Create a new filter:
-
Click Clear Settings to clear any mapping lines.
-
Designate where data should be placed in Milestones by clicking once on a field on the left (clipboard data) and then once on a field on the right (Milestones columns/fields). Detailed instructions:
-
Under Fields from line 1 of input file, click once on a field to import; under Field Usage in Schedule, click on a Milestones column or field where that data should appear. A mapping line will be appear to show the relationship.
-
Double-click a field on the right to remove a mapping line.
-
Milestones columns are numbered 1 to 10 on the left side of the schedule, with column 10 being closest to the timeline area. For example, if the schedule only has three columns on the left, then they are numbered 8, 9 and 10 from left to right.
-
Milestones columns are numbered 11 to 20 on the right side of the schedule, with column 11 being closest to the timeline area.
-
Do not map dates to columns. Map start dates from start-to-finish task bars to Task_1_Start_Date and their finish dates to Task_1_End_Date. Map the milestone dates to Milestone_Date_1.
-
For mapping multiple start and end dates per task row (per record), map the first set of dates to Task_1_Start_Date and Task_1_End_Date; map the next set of dates to Task_2_Start_Date and Task_2_End_Date, and so forth.
-
Map multiple milestone dates to Milestone_Date_1, Milestone_Date_2, etc.
-
Continue mapping fields.
-
Under Current Filter Name, enter a name for these mapping settings.
-
Click Save Settings.
Example: Custom Import From Clipboard
Use Custom Import From Clipboard to populate an existing Milestones schedule with fields copied from a spreadsheet.
Here are some sample steps in going from a spreadsheet to a Milestones Gantt chart.
-
Columns and rows of spreadsheet data are copied to the clipboard:

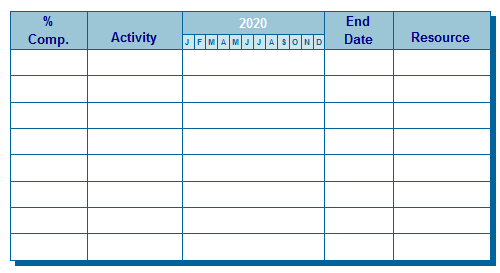
- The Milestones schedule formatted to receive the clipboard data:
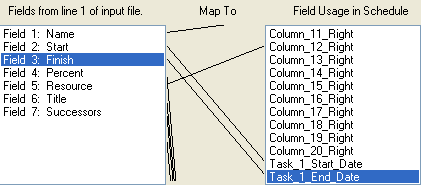
- The clipboard fields on the left are mapped to the Milestones columns and fields on the right:
The Name text will fill Column_10_Left, which is the Activity column in the schedule above.
The Start field maps to Task_1_Start_Date.
The Finish field maps to Task_1_End_Date, not to the End column.
The Percent field maps to Percent_Complete, not the % Comp. column.
The Resource field will fill Column_12_Right, which is the Resource column in the schedule above.
The Title field maps to Chart_Title, which is the title of the schedule.
The Successors field maps to Successors, which draws the vertical links.
- After importing the file, the resulting schedule looks like this:

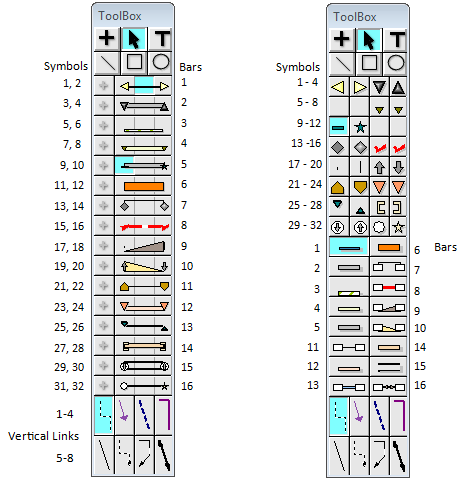
- The toolbox used when the file was imported looks like this. These settings can be extensively changed.
Custom import toolbox symbology
As many as 20 pairs of start and stop dates, and 4 milestone dates can be imported for each task row or record.
The symbol and bar types used are taken from the toolbox in the order of field usage as shown in the following table. See the picture below for symbol and bar numbering.
|
Field Usage
|
Start or Milestone Symbol
|
Bar
|
End Symbol
|
|
Task 1
|
Symbol 1
|
Bar 1
|
Symbol 2
|
|
Task 2
|
Symbol 3
|
Bar 2
|
Symbol 4
|
|
Task 3
|
Symbol 5
|
Bar 3
|
Symbol 6
|
|
Task 4
|
Symbol 7
|
Bar 4
|
Symbol 8
|
|
Milestone 1
|
Symbol 9
|
N/A
|
N/A
|
|
Milestone 2
|
Symbol 10
|
N/A
|
N/A
|
|
Milestone 3
|
Symbol 11
|
N/A
|
N/A
|
|
Milestone 4
|
Symbol 12
|
N/A
|
N/A
|
|
Task 5
|
Symbol 13
|
Bar 5
|
Symbol 14
|
|
Task 6
|
Symbol 15
|
Bar 6
|
Symbol 16
|
|
Task 7
|
Symbol 17
|
Bar 7
|
Symbol 18
|
|
Task 8
|
Symbol 19
|
Bar 8
|
Symbol 20
|
|
Task 9
|
Symbol 21
|
Bar 9
|
Symbol 22
|
|
Task 10
|
Symbol 23
|
Bar 10
|
Symbol 24
|
|
Task 11
|
Symbol 25
|
Bar 11
|
Symbol 26
|
|
Task 12
|
Symbol 27
|
Bar 12
|
Symbol 28
|
|
Task 13
|
Symbol 29
|
Bar 13
|
Symbol 30
|
|
Task 14
|
Symbol 31
|
Bar 14
|
Symbol 32
|
|
Task 15
|
Symbol 33
|
Bar 17
|
Symbol 34
|
|
Task 16
|
Symbol 35
|
Bar 18
|
Symbol 36
|
|
Task 17
|
Symbol 37
|
Bar 19
|
Symbol 38
|
|
Task 18
|
Symbol 39
|
Bar 20
|
Symbol 40
|
|
Task 19
|
Symbol 41
|
Bar 21
|
Symbol 42
|
|
Task 20
|
Symbol 43
|
Bar 22
|
Symbol 44
|
Use the following illustration as a guide:
|