The toolbox
|
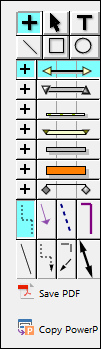
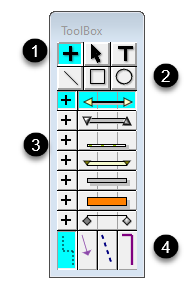
In addition to the main tools on the top row, the toolbox offers symbols, bars, vertical links and drawing tools. Each symbol, horizontal bar, and vertical link can be changed to a different shape, color and more. Changes to the toolbox are saved with the individual schedule. A custom toolbox can be saved with the default template.
Contents
|
Choose the toolbox location
|
Toolbox on the sidebar
|
Floating
For a free-floating toolbox, choose Do Not Show Sidebar. |

|
|
What's in the toolbox?
|


|
|
Customize the toolbox contents
Change toolbox properties
Change the number of rows of symbols and bars
Customize the toolbox vertical links
Vertical links can be used to establish dependencies (predecessor and successor relationships) between dates on different task rows. The set of links displayed in the toolbox is just a small subset of the vertical link types built into Milestones Professional. Double-click a vertical link in the toolbox to change its properties.
|
|
Largest possible toolbox
|
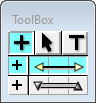
Minimalist toolbox
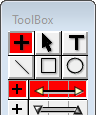
Background colorWe recommend light blue but other colors are possible:
Hide the floating toolboxFloating toolboxes can be hidden by right clicking the toolbox and choosing Hide Toolbox. To show a hidden toolbox, just right-click the schedule and choose Toggle Toolbox Display.
Customize the toolbox drawing toolsThe drawing tools in the toolbox are used to add extra annotation to the schedule.
|


|
|
Copy a toolbox to another schedule
-
Open both schedules in the same instance of Milestones (a single Milestones window with two files open).
-
Right-click anywhere on the toolbox
-
Choose Copy Toolbox.
-
Choose View | Window Controls | Switch Window menu and select the other schedule.
-
Right-click that schedule's toolbox and choose Paste Toolbox.
|
|
Copy and paste a toolbox row
A toolbox row can also be copied to another schedule. On the View tab, click the small arrow next to Switch Windows to use a different schedule Start every schedule with the same toolboxOnce a toolbox has been customized, it can be saved as part of the default template for use on all future schedules created with the New file icon. Just save a template (File | Save As | Personal Template) with the name Default.mtp
Hide or show tooltips for the toolboxTo hide tooltips which appear next to the cursor in the toolbox, choose Tools | Program Options | Help and choose Determine which toolbox symbol is used for a symbol that has been added to the schedule:
Default text for toolbox symbols
Change symbols on the schedule to another symbol type in the toolboxChange one symbol on the schedule to another symbol type in the toolbox:
Change many symbols on the schedule to another symbol type in the toolbox:
|
Related Topics