Columns

A schedule can have up to 20 columns (up to 10 columns on each side of the schedule area.)  A variety of column types are possible.  


Insert columns

Insert a single text or SmartColumn
  1. Click the arrow   next to Insert | Rows, Columns | New Column.
  2. Pick a column type.
  3. Choose Insert Column.
  4. A new column will be inserted directly to the left or right of the column whose heading was clicked.  If on the left side of the schedule, the new column will appear to the left.  If on the right side of the schedule, the new column will appear to the right.


A default title is automatically added for inserted SmartColumns.

Insert a single column next to an existing column
  1. Right-click a column heading.
  2. Choose Insert Column.
  3. A new column will be inserted directly to the left or right of the column whose heading was clicked.  If on the left side of the schedule, the new column will appear to the left.  If on the right side of the schedule, the new column will appear to the right.
Format a SmartColumn:
  1. Right click a column heading.
  2. Choose Properties.


Insert several columns:
  1. On the toolbar, choose Layout | Page Size | Overall Column Layout.
  2. Enter the column sizes in the boxes below the column numbers.  Numbers 1-10 are to the left of the schedule.  Columns 11-20 are to the right of the schedule.  When finished, click the apply button .


Move a column

  1. Click  (the toolbox arrow tool.)
  2. Click the top border of the column heading for the column to be moved.  The cursor changes to: .
  3. Drag the column to the desired location.  You will notice this symbol , indicating where the column will be inserted.
  4. Release the mouse to drop the column at the insertion point .


Hide or delete columns

Delete a column:
  1. Click (the toolbox arrow tool.)
  2. Move the mouse in the column heading area.
  3. When the cursor looks like this Miles00000330.gif, right-click with the mouse.
  4. Click Delete Column on the right-click menu that comes up, or press the keyboard Delete key.


OR...

  1. Click (the toolbox arrow tool.)
  2. Right-click the column heading.  
  3. Choose Delete Column.
Hide/unhide columns
  1. Right-click the column heading.
  2. Choose Hide Column to hide the column.
  3. With any column selected, choose Show Hidden Columns to show all columns.


Re-size a column

  1. Click (the toolbox arrow tool.)
  2. To change the column's width on the left side of the schedule area, click on the column separator to the right of the column. If the column to be re-sized is on the right side of the schedule area, click on the column separator to the left of the column. The cursor will change to Miles00000327.gif.
  3. Drag the column's edge to the appropriate size.
 

-or-

  1. Select the column. The toolbar will change to offer selections for that column
  2. In Selection | Column Type and Format | Width:, enter an adjusted column size.
  3. Press the apply button.
 

Change column cells

Select a task column cell:
  1. Click (the toolbox arrow tool.)
  2. Click once on the cell to select the task row.
  3. Click once more to select the cell.  This will display the Selection menu with all the properties for the cell.
 
Change a cell's background color and pattern:
  1. Select a column cell (see above)
  2. In the toolbar Background Cell Color section, click on the box next to Color. Then choose a color.
  3. Optionally, change the color in the box next to Target Color to choose a target color
  4. Optionally, choose a Pattern.  (If a pattern is chosen, then the Target Color is used for the pattern's second color.  Note that the Special Effects selection is ignored if a pattern is selected.)
  5. Choose Special Effects to fade the background color into the target color.
      
   
Change the color of the text in a single cell:
  1. Select a column cell. (see above)
  2. In the toolbar  Cell Text Settings section, choose Set Line by Line Text Color Overrides.
  3. For each of the first five lines of text in the column cell, choose an override color.
   
Change the font of the text in a single cell:
  1. Select a column cell. (see above)
  2. In the toolbar Cell Text Settings section, pick a new font, color, and other properties.


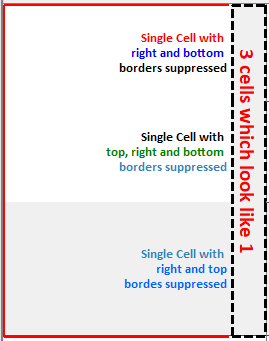
Set a cell's border:
  1. Click  (the toolbox arrow tool.)
  2. Click once on the cell to select the task row.
  3. Click once more to select the cell.  This will display the Selection menu with all the properties for the cell.
  4. In the Cell Border section, make a selection for Line Type and Color.
  5. Click the border edges (in the toolbar) to add or delete parts of the border.
  6. In the Background Cell Color section, choose Hide Bottom Grid  or Hide Right Grid to eliminate borders and combine cells.
Set a cell to allow text overflow
  1. Select a column cell. (see above)
  2. In the Cell Text Settings section,   Allow Text to Overflow from Cell.   


Work with column headings


The column heading is the area which contains the title for a column.

Up to two lines of text can be added to each column.

Add column heading text:
  1. Click once on the column heading. This will display the Selection menu.
  2. In the Column Heading Text section, enter a title for the column.
  3. Click the Apply Text Changes button.


Change the alignment for text in the column heading:
  1. Click once on the column heading. This will display the Selection menu.
  2. Apply these formatting changes to all column headings to make the following alignment changes to all column headings.
  3. In the Column Heading Text Display Settings section, change the Horizontal Alignment or Vertical Alignment.
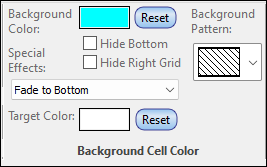
Change a column heading's background color:
  1. Click once on the column heading. This will display the Selection menu.
  2. In the Column Heading Text Display Settings section, make changes to background color, fading patterns, text highlights and more.
  3. Apply these formatting changes to all column headings to make the background color changes to all column headings.

Rotate column text

Rotate column text
  1. Select the column.  The toolbar changes to Current Object : Column.
  2. In the toolbar, in the Column Type and Format section, choose the angle for Cell Text:
90° (L) -90° (L) 90° (C) -90° (C) 90° (R) -90° (R)


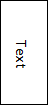
Rotate text in the column headings
  1. Select the column.  The toolbar changes to Current Object : Column.
  2. In the toolbar, in the Column Heading Text Display Settings section, choose the angle for Cell Text (0, 90 or -90)
 
-90° 90°

Set up a task column and enter project steps

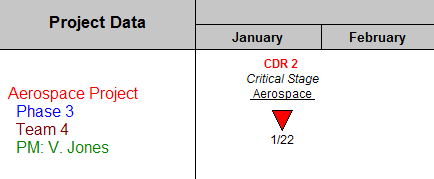
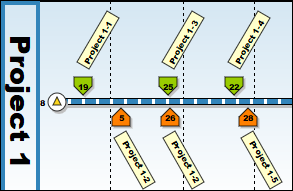
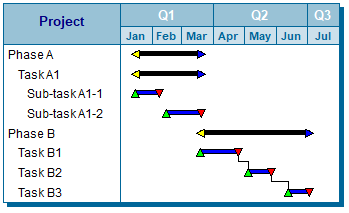
When outlining a schedule to show a hierarchy of activities such as Project, Phase, Task, Sub-task; it's a good idea to indent each hierarchical level to set them apart from each other.

For example, "Phase A" might be outline level 1 with no indention; Task A1, Task B1, Task B2, and Task B3 are outline level 2. The Sub-task activities are outline level 3:

 The minimum indenting value is .10.   Tabbing in a column cell without Use TAB key for Outlining, (found in Tools | Program Options | Edit) is not supported in metafiles. The resulting metafile displays a small rectangle in place of the tabbed spacing.  

Set up an outlined column:
  1. Select the column whose entries should be indented based on outline level.

  2. In the Column Type and Format section, enter an indent amount (.2 is an effective outline indention) under Indent per Outline Level.

  3. Click to apply the indent to the column.  (Be sure the column text is left justified.)Enter project steps

Enter project steps in a column

  1. Click  (the toolbox Text tool.)

  2. Click once within a column cell.

  3. Enter text directly in the cell.

  4. Use the keyboard up-arrow and down-arrow keys to move from cell to cell.

Enter column text using the toolbar
  1. Click  (the toolbox Text tool.).

  2. Click once within a column cell.  The toolbar changes to Current Object: Cell

  3. Enter text in the Cell and Tag Text section.

  4. Press the apply button.

 Up to 500 characters (letters or numbers) can be entered into any one cell.

Word wrap

Text entered into a column cell via the dialog box can be word wrapped within that and all other Column Text and Task Row Properties windows. Without word wrap, the text appears in the dialog box as a single, linear entry.

This does not affect the display of the text in the cell. By default, text wraps in a column cell.

Turn on Word Wrap for all column cell dialog boxes:

  1. Double-click any column cell.

  2. Word Wrap text in box below.


Tips for entering column text
  • When typing text directly in a column cell (not the dialog box), words will wrap to the next line within the block as long as there is room. To control where the text lines break within a cell, use the Enter key.

  • To have the row height to adjust automatically as text is typed directly in a column cell (not the dialog box), turn on the option Automatically Adjust Row Height when Entering Text. Find this option under Tools | Program Options | Edit tab.

  • If a column is defined as a SmartColumn, the text that is entered may have an effect on the schedule such as adding a symbol, changing duration or changing percent complete.

  • If text is typed, but the text disappears, the column may have been previously set up as a SmartColumn. Double-click the column heading to redefine the column as a normal column.  (Smartcolumn type "none")

  • If text is centered or right-justified and appears out of alignment, it is possible that the column has an indent set. To remove the indent: select the column and change the value for Indent per Outline Level to 0.  Press the apply button.


Copy and paste column text

A column's text can be selected and copied to another column or to another application.

Copy a column of text to the clipboard:
  1. Select a column on the schedule. 

  2. In the column heading, right-click and choose Copy Column Text.  The column text is now on the Windows clipboard and is available to paste.

Paste a column on the same schedule:
  1. Insert a new column.

  2. Select the new column.

  3. In the column heading, right-click and choose Paste Column Text.  


 A column can be pasted to another schedule or another Windows application in a similar way.

Clear column text entries

Text in column cells can be deleted without deleting the column itself.

Clear text entries in a column:

  1. Move the cursor into the column heading area.

  2. Right-click and choose Clear Column Text

 SmartColumn entries which are driven by schedule data (e.g. Duration, Start Date, Calculation/Indicator) cannot be deleted in this way.  Instead, change the column's type to none.   SmartColumn entries such as Values SmartColumn values, Budget SmartColumn values, and Actual SmatColumn values can be cleared (set to 0) using this method.


Related Topics

  1. Columns with indicators
  2. SmartColumns
  3. Microsoft Project import - Populate a column with a Microsoft Project field
  4. Column headings
  5. Indent_column_text_based_on_outline_level


Guided Help Home


The fast easy way to schedule your projects:  Milestones Software by KIDASA Software, Inc. www.kidasa.com

Copyright © 2025 KIDASA Software, Inc. All rights reserved.