The Legend is the area reserved for documenting the usages of the symbols, bars and vertical links on the schedule. While usually positioned below the schedule, it is also possible to "float" the legend anywhere on the schedule.  In addition to the standard legend, it's also possible to create a legend using the box tool.  See Groups

The legend

Contents

    1. Create and format the legend
    1. Add a legend entry:
    1. Change a legend entry:
    1. Delete a legend entry:
    1. Delete the legend:
  1. Copy a legend to another schedule:
  2. Create a legend using a group

Create and format the legend

  1. Click Layout | Legend Size | .
  2. In the Legend Size and Frame Settings section, do the following:
    1. Enter a value for Legend Height (1.0 inch is a common entry).
    2. Choose a value from the drop-down menu next to Legend Symbol Size Override:
    3. Choose a value from the drop-down menu next to Entries Per Row. For example, if the Entries Per Row value is 3 and there are 5 legend entries, then the 4th and 5th entries will display on a second row in the legend.
    4. Choose to have a Floating Legend.  Optionally, Limit the Floating Legend to just the following pages to place a floating legend only on certain pages of the schedule.  Use the mouse to move and re-size the floating legend.
    5. Frame Legend to add a border around the legend.
    6. Leave Gap between Chart and Legend for spacing above the legend and below the schedule.

    7. Draw Shadow to add a shadow to the right and bottom edge of the legend.  Choose the Shadow Color.
      1. Always press the button to make sure changes made in the toolbar are reflected in the schedule.
  3. In the Background section, click on the color box to select a background color for the legend.
    1. Optionally click on the color box for Target Color.
    2. Choose Special Effects to fade the background color into the target color.
  4. In the Font Settings section, choose a font, text style, font size, and legend text color for the legend text.
  5. Use the mouse to rearrange legend entries after they are place.

Example:

 If a legend does not exist, and Insert | Picture, Legend | New Legend Entry is chosen, a legend will be created with default settings.  For the legend entries to "stack" one entry on top of the next entry, set the Entries Per Row to 1.  These options can be locked against further editing in File | Page Size | Lock Layout.


Add a legend entry:

Legend entries display a symbol, a symbol with a bar, two symbols, or two symbols with a bar.  Two lines of text can be shown with each entry. Choose Insert | Picture, Legend | New Legend Entry to automatically create the legend area, or first set the legend properties before inserting legend entries.


  1. Choose Insert | Picture, Legend | New Legend Entry.  The toolbar shows:
  2. Enter the text for the legend (Line1 and Line 2.)
  3. The selections above will display the following in the legend:


A new legend entry can be added using the toolbox.  Just right click the small + next to the toolbox row to be added and choose Insert Selected Row into Legend.  


Change a legend entry:

Change legend properties
  1. With  (the toolbox Arrow tool) click once on the legend entry.  This should display the Selection menu for Legend Entry Settings.

  2. Make changes in the toolbar (see picture above.)

-or-

  1. Double-click the legend entry.

  2. Make any changes.


 If a symbol or bar which is displayed in a legend changes in the toolbox, then that legend entry will change accordingly.

Move a legend entry


  1. Click the legend entry

  2. While holding down the left mouse button, drag the legend entry to the new location in the legend. As the legend is moved, the cursor changes to until the left mouse button is released.

  3. Release the left button.  

  Legend entries are ordered left to right.  When a new entry is moved to position 1 (upper left), legend entries will shift to the right.  The last legend entry on a row will move to the first position of the next row.  


Delete a legend entry:

  1. Click (the toolbox Arrow tool).  

  2. Click once on the legend entry that is to be deleted.  

  3. Press the Delete key on the keyboard.  


 Another way to delete a legend entry is to right-click the entry and choose Delete Legend Entry.

Delete the legend:

  1. Right-click the legend and choose Hide Legend.


Copy a legend to another schedule:

(Note that the toolboxes should be the same on both schedules.  (Copy and Paste the toolbox before copying the legend.)
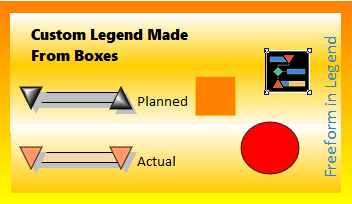
  1. Open both schedules in the same instance of Milestones (in a single Milestones Window.)

  2. Click (the toolbox Arrow tool).

  3. Right-click the legend.

  4. Choose Copy Legend.

  5. Choose View | Window Controls | Switch Window and choose the other schedule.

  6. Right-click the legend.

  7. Choose Paste Legend.

  To use the same legend for all new schedules, save the legend as part of your default template.  Learn more.


Create a legend using a group

In addition to the default legend, it's possible to make a legend using the box tool and by grouping text and other elements.  See Groups.


Related Topics

  1. Page layout
  2. Groups