|
#
|
Description |
Example |
Status |
Symbol Text* |
|
1
|
Milestone: Finish
Displays Finish
date as a single milestone.
|
 |
Uses
numeric % complete field specified or % complete. If
<100%, will use after status shape and color. |
Added
to Finish date.
|
|
2
|
Milestone: Start
Displays Start
date as a single milestone.
|
 |
Uses
numeric % complete field specified or % complete If
% complete=0, will use after status shape and color. Otherwise
will use shape and color shown in toolbox. |
Added
to Start date. |
|
3
|
Milestones: Start and Finish
Start and Finish
dates are displayed as individual milestones.
|
 |
Same
behavior as described above for Start and Finish. |
Added
to Start and Finish dates. |
|
4
|
Milestones: Start and Finish and Baseline
Start and Finish
Displays Start,
Finish, Baseline Start and Baseline Finish as individual
milestones. Baseline symbols will use the toolbox
row immediately following the toolbox row specified for
Start and Finish.
|
 |
Same
behavior as described above for Start and Finish. |
Added
to all symbols. |
|
5
|
Bar: Start and Finish
Displays the
Start and Finish dates connected using the bar in the
toolbox row specified
|
 |
Uses
numeric % complete field specified or % complete to set
progress for the bar. |
Added
to Start date. |
|
6
|
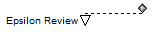
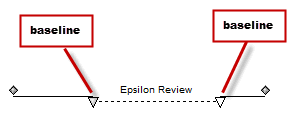
Bar: Baseline Start and Baseline Finish
Displays the
Baseline Start and Finish dates connected by a bar.
|
 |
N/A |
Added
to Baseline Start date. |
|
7
|
Bar: Finish with slip
Displays the
Finish date, connected to the Baseline Finish date
|
 |
Uses
numeric % complete field specified or % complete. If
<100, Finish milestone will use after status shape
and color. |
Added
to Finish date. |
|
8
|
Bars: Start-Finish and Baseline Start-Baseline
Finish
Two bars are
added. The first bar is the Start date connected
to the Finish date using the symbols and bar in the row
specified. The second bar is the Baseline Start
connected to the Baseline Finish, using the symbols and
bar in the row immediately below the row specified.
|
 |
Uses
numeric % complete field specified or % complete to set
progress for the bar. |
Added
to Baseline Start date and Start date. |
|
9
|
Bar: Start and Finish with Status.
The
Start
date is connected to the Status Date field specified in
the wizard. Then, the second bar is drawn from Status
Date to Finish date.
The left-most
symbol of the toolbox row specified is used for both the
start and end dates. The right-most symbol is used
for the status date (if a date field is used for status.)
|
 |
If
a numeric status field is specified (like % complete),
draws the bar from start to finish using the % complete
field specified.
Otherwise draws
two bars using status date field.
|
Added
to Start date. |
|
10
|
Bar: Start and Finish with slips.
The Start date
is connected to the Finish date using symbology on the
toolbox row specified.
The Start date
is then connected to the Baseline Start using the left-most
symbol of the toolbox row immediately below the toolbox
row specified.
Last, the Finish
date is connected to the Baseline Finish using the right-most
symbol of the toolbox row immediately below the toolbox
row specified.
|
 |
Uses
numeric % complete field specified or % complete
Start
date: If %
complete=0, will use after status shape and color. Otherwise
will use shape and color shown in toolbox.
Finish
date: If <100,
will use after status shape and color.
|
Added
to Baseline Start date and Start date. |
|
11
|
Bar: Baseline Start and Baseline Finish
with slips.
The Baseline
Start date is connected to Baseline Finish date using
symbology on the toolbox row specified.
The Start date
is connected to the Baseline Start date using the left-most
symbol of the toolbox row immediately below the toolbox
row specified.
The Finish date
is connected to the Baseline Finish date using the right-most
symbol of the toolbox row immediately below the toolbox
row specified.
|
 |
Uses
numeric % complete field specified or % complete
Start
date: If %
complete=0, will use after status shape and color. Otherwise
will use shape and color shown in toolbox.
Finish
date: If <100,
will use after status shape and color.
|
Added
to Baseline Start date and Start date. |
|
12
|
Bar: Start and Finish with Status and
Baseline.
This is the
same as #9 but will also show baseline.
The Start date
is connected to Status Date field specified in the wizard.
Then, the second bar is drawn from Status Date to
Finish date.
The left-most
symbol of the toolbox row specified is used for both the
start and end dates. The right-most symbol is used
for the status date if a date field is used for status.
NOTE: You may
need to update your Milestones Professional 2015 software
as this feature was added in May, 2015.
|
 |
Uses
numeric % complete field specified or % complete
Start
date: If %
complete=0, will use after status shape and color. Otherwise
will use shape and color shown in toolbox.
Finish
date: If <100,
will use after status shape and color.
|
|
|
13-22
|
Bar: Baseline(1-10) Start and Baseline(1-10)
Finish
Displays the
Baseline Start and Finish dates connected by a bar.
13-Baseline1
14-Baseline2
15-Baseline3
16-Baseline4
17-Baseline5
18-Baseline6
19-Baseline7
20-Baseline8
21-Baseline9
22-Baseline10
|
|
N/A |
Added
to Start date. |

