|
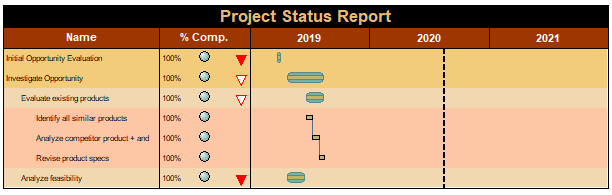
Outlining is useful for organizing parts of a schedule. It’s best to outline a schedule with enough levels so each task level has a clear, definable item of work that can be identified, budgeted, assigned, and tracked.
Summary bars are shown automatically for lower level tasks. Once a schedule is outlined, use the roll-up feature to present different levels of schedule complexity to various audiences.Costs, budgets and other numerical values associated with lower-level tasks can automatically roll-up (sum) to each upper outline level. See: Tutorial Lesson 6 - Outline a schedule
|
|
LEARN MORE:
|
Basics:
Add an outline level SmartColumn:
- Choose Insert | Rows, Columns | New Column | Outline Level.
Indent or outdent a task
- Change the number in the Outline Level Smartcolumn.
-or-
- With
 (the toolbox text tool) click within the column area to select a task. (the toolbox text tool) click within the column area to select a task.
- Use the arrows to indent / outdent:

Set the indentation amount for outline levels
-
Select the columnSelect the column whose entries should be indented based on outline level.
-
Click
.
-
Move
the cursor to the lower edge of . The cursor will change and will look
like this: 
-
Click
once to select the column. The column will highlight to indicate
the column is selected.
-
In the Column Type and Format section, enter an indent amount (.2 is an effective outline indention) under Indent per Outline Level.
-
Click  (the apply button) to apply the indent to the column. (the apply button) to apply the indent to the column.
Collapse (roll-up) and expand tasks
Milestones Professional schedules can be outlined using an easy to manage indenting capability. Main steps are typically at outline level 1. The steps immediately under the level 1 steps are outline level 2. Up to 20 outline levels are supported. In an outlined schedule, task rows can be expanded (shown) or collapsed (rolled up and hidden) using collapse/expand indicators, the right-click menu, or the filter option. Using the collapse/expand indicators or an option on the right-click menu, roll-up and expand of tasks is easy.
Use Collapse/Expand Indicators to hide/show lower level tasks:
-
Choose View | Optional Items | Collapse/Expand Indicators. Collapse/Expand indicators ( ) will appear to the left of the schedule area. ) will appear to the left of the schedule area.
-
The expand indicator () appears when there are hidden lower level tasks which can be expanded (shown).
-
The collapse indicator ( ) appears when lower level tasks are visible and can be collapsed (hidden). ) appears when lower level tasks are visible and can be collapsed (hidden).
-
Task rows without lower level tasks will not display either indicator.
-
To collapse (roll-up) lower level tasks, click .
-
To expand, click .
 To change the color, size and shape of the collapse/expand indicators, go to Tools | Program Options | General. Change the color next to Roll-up triangle color. Then, pick a shape and pick a size. To change the color, size and shape of the collapse/expand indicators, go to Tools | Program Options | General. Change the color next to Roll-up triangle color. Then, pick a shape and pick a size.
Collapse/Expand indicators:
The Collapse/Expand icons are only shown on task rows which can be collapsed or expanded. That is, task rows without lower-level detail will not display the collapse/expand icons.

Collapse/expand a single outlined section:
-
Right-click the task row whose lower level task rows to collapse (roll-up) or expand.
-
Choose Collapse (or Expand) Selected Task Row.
Collapse all tasks to a specified outline level:
-
Right-click the task row whose lower level task rows to collapse (roll-up) or expand.
-
Choose Collapse All Tasks to Selected Level.
Filter tasks to a specified outline level:
-
Choose Tools | Filter | Filter Task Rows.
-
Optionally,  Only examine currently visible tasks if hidden tasks should remain hidden. Only examine currently visible tasks if hidden tasks should remain hidden.
-
Choose the Outline Level from the selection list.
-
In the Outline Level Filter Selection dialog box, choose the lowest outline level that should appear.
Expand all tasks by choosing the right-click menu Show All Task Rows.
Shade based on outline level
Outline level shading can help make a schedule more presentable. It's easy to set up and when the automatically apply option is on, the task shading will take effect as the schedule is changed.
Customize the task row background shading, column text, horizontal grid lines, and summary bar settings for any of the 20 outline levels. Each outline level can have its own settings. These settings will override the schedule default settings.
Add outline level shading
-
Choose Format | Gridlines | Gridlines, Shading, Font Sizes by Outline Level.
-
Select the Outline Level for task shading settings.
-
To have choices apply to all column areas and the schedule area, Apply New Grid/Shade Selections to all Three Sections.
-
Under the Shading tab, place a check-mark next to Shade the Task Rows for each section for which shading should be shown.
-
Click the Change button for Left Columns, Graph/Schedule Area, and Right Columns. Choose a color.
-
For Effects Target Color, click the Change button for Left Columns, Graph/Schedule Area, and Right Columns. Choose a color.
-
For Special Effects, choose a fade effect for Left Columns, Graph/Schedule Area, and Right Columns.
-
To have new task rows and edited task rows follow these same settings automatically, Automatically Apply Outline level properties while editing schedule.
-
Continue formatting with the gridlines, column text and summary bar settings for this outline level.
Summary bars
|