|
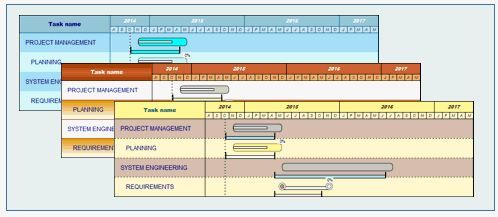
Color themes set predefined background shading for most areas of the schedule -- task rows, chart title, date headings, columns, column headings, schedule background, legend, DataGraphs, and toolbox symbol and bar fill colors. Choose from more than 40 color themes or create a color theme, then apply the theme to a new or existing schedule for instant color formatting.
Apply a color theme to a new or existing schedule:
-
Choose the Format tab.
-
In the Color Themes section, pick a color theme from the list, and see a preview of the theme as it applies to the schedule (click Cancel to return to the original schedule).
-
Use Outline Level Shading: Applies the color theme shading to all schedule areas and uses the outline level shading for task shading, which overrides all other shade settings.
-
Use Schedule Shading: Applies the color theme shading to all schedule areas and uses the horizontal task row shading for task shading (either no shading or odd/even row shading), instead of the outline level shading.
-
Do not alter Task Shading: Applies the color theme shading to all schedule areas, yet retains the schedule's current outline level shading.
-
No Task Row Shading: Applies the color theme shading for all schedule areas, yet clears all task row shading. The schedule's background shading is displayed.
-
 Include Toolbox Colors: Applies the color theme's toolbox colors to the existing toolbox. Include Toolbox Colors: Applies the color theme's toolbox colors to the existing toolbox.
-
Leave Out Gridlines: Applies the selected color theme without any gridlines.
-
Override all Symbol Note Colors: Uses the color theme's note background color.
Apply a color theme to a schedule whose outline level shading should remain intact:
-
Choose Format | Color Themes.
-
First, choose Do not alter Task Shading from the drop down menu to apply the color theme shading to all schedule areas, yet retain the schedule's current .
-
Optionally, Include Toolbox Colors to apply the color theme's toolbox colors to the existing toolbox, and/or Leave out Gridlines to apply the theme with no gridlines.
-
Click on a color theme from the list, and see the preview of the theme as it applies to the schedule.
Create and save a color theme from an existing schedule:
-
Format the schedule's background shading for task rows, chart title, date headings, columns, column headings, legend, DataGraphs and toolbox symbol and bar colors. Choose to create either outline level shading, gridline, and text formatting; or create default horizontal task row shading and gridline formatting.
-
After the schedule has the desired look, choose Format | Color Themes | Manage Color Themes. 
-
Enter a name for the color theme.
-
Click Save Theme.
-
Click Close.
Delete a color theme from the list of themes:
-
Choose Format | Color Themes | Manage Color Themes.
-
Click on a name from the color theme list.
-
Click Delete Selected Theme.
-
Click Close.
 Color themes do not override column cell by cell settings. To reset all individual overrides made to column cell text color and size back to the schedule defaults, select any column, click any column and choose Selection | Column Type and Format | More Column Options | Reset all Row and Cell Font/Color Overrides for all Columns. Color themes do not override column cell by cell settings. To reset all individual overrides made to column cell text color and size back to the schedule defaults, select any column, click any column and choose Selection | Column Type and Format | More Column Options | Reset all Row and Cell Font/Color Overrides for all Columns.
|