|

Create a custom heading:
-
Click the date heading on the schedule once. This will display the Selection menu.
-
Choose Selection | Current Object: Date Heading |  Edit Custom Headings. Edit Custom Headings.
-
Choose Custom Type 1 (or any custom heading that is available for use).
-
In the first cell under Date Heading Text, enter the first heading text (e.g. "Phase 1").
-
Tab over to Date that Time Period Ends On, and enter the date that the first time period ends.
Refer to the project's starting date to determine the beginning date for the first entry's time span. That is, if the project start date is 1/1/2021 and the first date entry is 2/28/2021, then the first custom heading will span from 1/1 to 2/28.
-
Continue these steps until all dates and headings have been entered.
Create up to four different user-defined date headings per schedule which can be incorporated into any or all of the date heading levels on the schedule. Sections can be colored for extra emphasis.
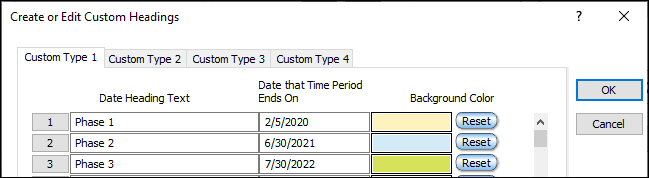
Custom heading example:
In the example below, 3 Date Heading Text entries are assigned end dates.
This is the resulting date heading display:

Custom heading example 2:
To create a heading like this, set the date range to 4 years. Set the custom date headings (4) to end on the last day of each year. While the schedule won't really be in millions of years, it will appear that way.

Edit a custom heading:
-
To delete a custom heading line entry, click on the line number and press Delete Entry.
-
To insert a custom heading line entry, click on the line number below the line to insert and click Insert Entry.
-
If the custom heading dates are out of order, sort entries by date by choosing Sort.
Display custom headings:
-
Click once on the date heading in the schedule area. This will display the Selection menu.
-
Click on the drop down menu for a Heading Type.
-
Choose a Custom Heading Type (towards the bottom of the list).
 Choose Custom Heading Data is Embedded in Schedule before sharing a schedule with others or moving the schedule to a different computer. Choose Custom Heading Data is Embedded in Schedule before sharing a schedule with others or moving the schedule to a different computer.
|