|
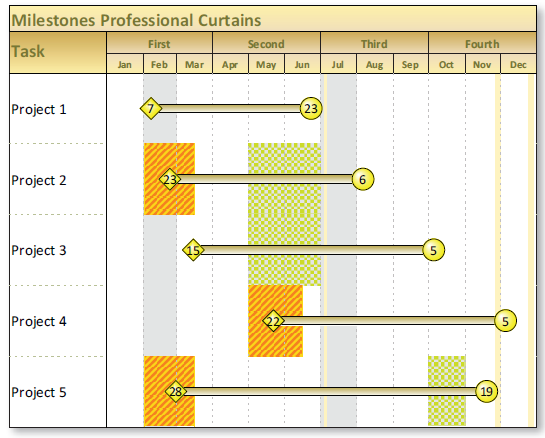
Curtains offer a way to shade any date range on a schedule. Curtains might be used to shade a critical project time span, a holiday season, every other month, or any other time period.
Each curtain appear for a set date range or repeat for a designated period, at specified intervals. the schedule can have as many curtains as needed.
Create a new curtain

- On the Format tab, in the Vertical Shading section click Curtains (Shade by Date Range). Then, in the Curtain Setup dialog box, click the Add button to add a new curtain. (See details for the Curtain Setup dialog box below)
- Enter an Optional Curtain Label if text is needed for curtain.
 Show Label to have it appear on the curtain. Pick a Position and set the Font properties. The label can be up to 200 characters long. Show Label to have it appear on the curtain. Pick a Position and set the Font properties. The label can be up to 200 characters long.
- For Date Range, enter the Start Date and Time (when the curtain should begin) and End Date and Time (when the curtain should end).
 Repeat a Curtain if this is a curtain to be repeated. Next, specify how often the curtain should be repeated. Repeat a Curtain if this is a curtain to be repeated. Next, specify how often the curtain should be repeated.- Set the curtain properties (Fill Pattern, Pattern Color, Background Color and Special Effects (only for solid colors.)
- Show Border on Sides of Curtain to draw a line on each side of the curtain(s). Specify the Border Color and Border Line Type.
- One of the choices for where the curtain should display. (Only show this curtain in the Date Headings, Only show this curtain in the Schedule Area, Only show this curtain in the DataGraph Area.)
- Specify a Name for Task Row Usage only if the curtain will be selected by task.
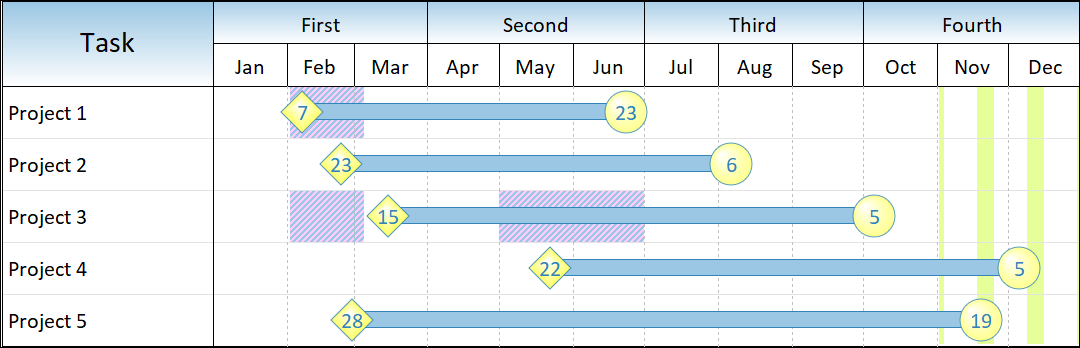
Repeating curtain
For example, set the curtain to appear between 1/1/2024 and 6/30/2024 (as set by the schedule details), for a 1 month duration, appearing every 2 months.

Add a named curtain to a task row
If a named curtain has been created (step 8 above), it can be easily added to a task row:
- Right click a task row and choose Curtain.
- In the Curtains for Current Task Row dialog box, pick up to 5 named curtains for the task row.
- Optionally, it's possible to override the start and end dates for each named curtain. The overrides will only apply to the task row.
- Press OK to see the curtain applied to the task row.
Curtain Setup
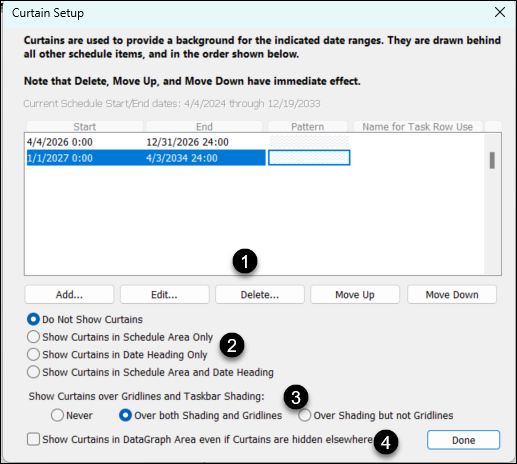
Global settings for curtains are in the Curtain Setup dialog box. (Tools | Vertical Shading | Curtains...)
- Use the Add, Edit, Delete, Move Up, or Move Down buttons as needed. Add or Edit will bring up the Curtain Add or Edit dialog box for a single curtain. Global properties are set on the Curtain Setup dialog box.
- Specify where the curtains should appear. Some of these settings can be overridden for an individual curtain.
- Specify how the curtains should appear along with the schedule shading and grid lines.
- Show Curtains in DataGraph Area .... to force curtains to appear in the DataGraph(s)
 To display the curtains over horizontal gridlines, check To display the curtains over horizontal gridlines, check  Show Curtains over Horizontal Gridlines. Also note that marbled curtains are full-colored bitmaps which will ignore any foreground or background color settings. Use of these curtains increases the size of printer files and metafiles, especially on high-resolution printers. Thus, printing time may be increased. Show Curtains over Horizontal Gridlines. Also note that marbled curtains are full-colored bitmaps which will ignore any foreground or background color settings. Use of these curtains increases the size of printer files and metafiles, especially on high-resolution printers. Thus, printing time may be increased.
|