Freeform text
Each freeform text block can be formatted to display a solid or two-color background fill color, a border, and a shadow. A selected freeform text block can appear on all schedule pages.
![]() Tutorial Lesson 3 - Work with text
Tutorial Lesson 3 - Work with text
|
|
Contents
|

Add freeform textChange the appearance of freeform textWith the
|

 tool, click once on the Freeform text block. The toolbar displays the options for Freeform Text:
 |
Update text in this box. Press the keyboard Enter key between lines. Press the Update Text button when done. |
|
 |
Add a shadow and change the shadow color.
|
|
 |
Change the fill color and effectseffects. Choose to have extra space around the text:
|
|
 |
Choose to show the text on all pages or only one page.
|
|
|
Set the text color, alignment, text properties and angle:
|
|
|
| |
Add a border:
|
|
 |
Make the text part of a group. See groups.
|
 |


-
Set Line by line color for freeform text
-
It's possible to color individual lines of freeform text. Here is an example
-
Enter this:
-
<rgb:57,60,99>Freeform text
-
<rgb:255,128,0>line
-
<rgb:162,169,196>by
-
<rgb:0,128,0>line
-
<rgb:255,0,0>color
Individual lines are colored:

-
Move, copy, or delete freeform text
Move freeform text
Delete freeform text
|
Copy freeform text
Note: This operation will copy the entire freeform text block, including background colors, text, and other attributes. |
Substitutable freeform text:


Manage freeform text:
- Tools | Other Tools | Manage: Symbols, Pictures, Freeform Text, .....
- Click Manage Freeform Text.
- Choose one of the schedule's freeform text objects from the list.
- By default, text is shown on the page on which it was added. To move it to a different page, enter the page number.
 Show on all pages to show the text on all pages.
-
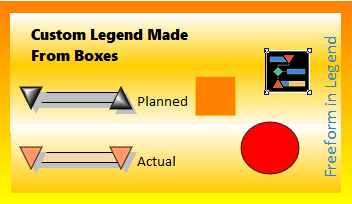
Freeform text sampler
This example shows the many possibilities for freeform text.

 If you need text to "stick" to a symbol or task, try symbol text or symbol notes.
Add an embedded bitmap symbol to a freeform text block
The purpose of doing this is to allow pictures added to the schedule to be transparent on screen and/or clipped when sent to PowerPoint. Previously, embedded pictures would often show undesirable white space.
- Add an embedded bitmap symbol to the toolbox. Add a clipping symbol as needed.
- Double-click the symbol in the toolbox.
- Click Create/Update &symbol(..) command. Once clicked a command will be generated in the text block below:
- Copy the text that is generated. (Highlight and choose CTRL-C)

- Using the
 , click anywhere on the schedule.
 - Paste the text generated in steps 3-5 above. To increase the size, change the second parameter to a number between 1 and 25. example: &symbol(25,25.00,14,18,L-9868950). Parameters:
- Symbol number in the toolbox
- Size (1-25)
- Clipping symbol index
- tbd (ignore for this type of use)
- Combined color index (ignore for this purpose)
Related Topics