|
Importing into Milestones from a spreadsheet is made easier with Smart Import From Clipboard. Column headings in the Excel spreadsheet determine how the Milestones schedule is produced. (The first row in the spreadsheet is considered the column heading.)
Schedules imported using Smart Import from Clipboard can be refreshed (updated) when the spreadsheet is changed as long as a column labeled Unique ID is included.

Import using the Smart Import From Clipboard option:
- Open both Milestones Professional and the spreadsheet application.
- In the spreadsheet application:
- The first row is considered the column heading. The first row must contain field names, which will be used to add or match a column in Milestones. Milestones does a good job of interpreting these field names. For example, Start or Start Date in the spreadsheet will create or map to a Milestones Start Date SmartColumn. Finish or End Date will map to the Milestones Finish Date SmartColumn. Milestones will recognize the following: Start, End, Baseline Start, Baseline End, Percent Complete, Outline Level, or WBS Number.
- If the Milestone schedule will later be refreshed (updated) with dates from a changed Excel spreadsheet, then the spreadsheet must have a column with the title of Unique ID.
- If using non-standard names for Start, End, Baseline Start, Baseline End, Percent Complete, Outline Level, or WBS Number, then use the Smart Import Settings (Connections| Excel | Import/Update from Excel | Smart Import Options to make additional settings.
- If bringing in other information from Excel, (for example a cost column) then set the column up in Milestones before. Make sure the column heading in Milestones matches the column heading in Excel.
- A UniqueID column can be included. If the spreadsheet has a UniqueID column, then the task rows and symbols will be tagged with the UniqueID from the spreadsheet. This is useful if, later, the Milestones schedule needs to be refreshed with new dates from the spreadsheet.
- In Milestones:
- Add a column for each text or generic column you want to bring in. (Columns other than: UniqueID, Start, End, Baseline Start, Baseline End, Percent Complete, Outline Level, or WBS Number) The column heading should match the column heading in Excel. For example, if the task name column is called Task Names in Excel, you should set up a Task Name text column in Milestones and set up the indentation for the column.
- Set the Milestones date range to accommodate the dates in the spreadsheet.
- If importing status using a Percent Complete SmartColumn, set up status features such as Fill to Status Date and Allow Hourly/Minute Detail (to portray exact percent complete as shown on spreadsheet).
- Set up the first row in the toolbox for the start and finish dates.
- Set up the second row in the toolbox for the baseline start and baseline finish dates.
- In the spreadsheet, highlight and copy the cells to be pasted into Milestones.
- Each record is expected to be on a line by itself and have the same field layout. Date fields must be formatted as mm/dd/yy, m/dd/yy or m/dd/yyyy. When using a different separator, choose the format with two digits for each, e.g. dd.mm.yy.
- In Milestones, choose Connections| Excel | Import/Update from Excel | Smart Import from Clipboard.
Accepted SmartColumns for Smart Import from Clipboard:
Milestones SmartColumns must be built and formatted before selecting Smart Import from Clipboard. Remember, in order to populate a schedule in Milestones from a spreadsheet accurately, the column headings in the spreadsheet and in Milestones must match exactly. The following SmartColumns can be populated using the Smart Import from Clipboard option.
• Start Date - brings in a milestone*
• Baseline Start Date - brings in a milestone*
• End Date - brings in a milestone*
• Baseline End Date - brings in a milestone*
• Outline Level - defines an outline structure
• WBS - defines an outline structure
• Percent Complete - defines percent complete for a task, creates in a status symbol**
All other columns in the spread sheet will be brought into the Milestones schedule as text columns.
 If both a start date and an end date or a baseline start and a baseline end date are on the same row, they will be connected with a bar. The 32nd symbol in the toolbox becomes the status symbol. Double click this symbol in the toolbox to change its properties. If both a start date and an end date or a baseline start and a baseline end date are on the same row, they will be connected with a bar. The 32nd symbol in the toolbox becomes the status symbol. Double click this symbol in the toolbox to change its properties.
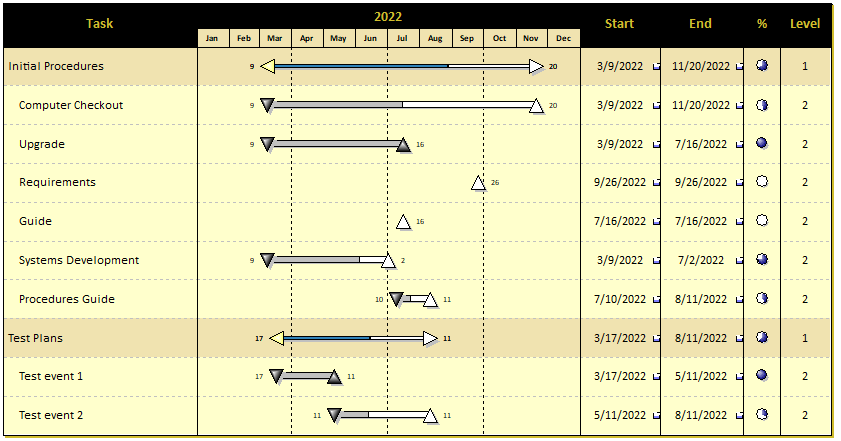
Example: Smart Import From Clipboard
Spreadsheet:
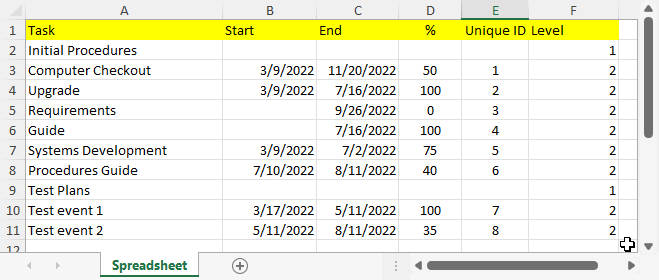
Resulting Milestones file after using Smart Import from Clipboard:
Refresh a schedule generated from Smart Import from Clipboard
-
Open both Milestones Professional and the spreadsheet application.
-
In Excel, select the updated spreadsheet data including the first row of column headings and copy to the clipboard.
-
In Milestones,Connections | Refresh Previously Imported Project| Refresh from Clipboard. The Refresh from Clipboard dialog displays.
-
In the dialog box, be sure that the correct field is picked for Refresh Using. Make other selections on the dialog box and choose OK to continue.
More
If, after importing, the task bars and milestones do not appear, the date heading may be out of alignment with the task dates. Simply adjust the schedule's visible date range. If that does not help, then confirm that the dates from the CSV/TXT file were formatted correctly and mapped correctly, as noted above.
|