Show progress

Milestones offers many ways to display and revise progress on a schedule. An activity’s progress can be updated by changing the percent complete value, the duration value, the status date, or by moving a status symbol. 

 Tutorial Lesson 7 - Show Progress


Fill symbols and bars up to the status date

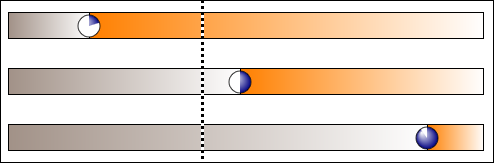
The Symbols - Fill to Status Date and Bars - Fill to Status Date feature causes symbols and bars to be filled up to the status date. After the status date, the symbols and bars will show the after status color.  Symbols will show the after status (incomplete) shape if specified in the toolbox.

Turn fill to status dates on: 
  1. Choose Dates | Date Related Settings | Symbols: Fill to Status Date.

  2. Choose Dates | Date Related Settings | Bars: Fill to Status Date.


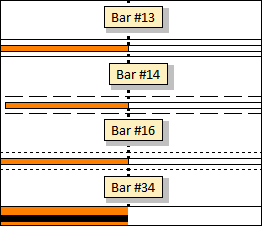
Bars #15, 27, 29, 38, 43-46, 51, 68, 69, and 70  ignore date sensitivity.


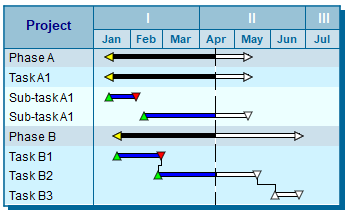
Change the symbol shape after the status date

Customize a symbol to change after status
  1. Double-click a symbol in the toolbox.

  2. On the Color/Pattern/Size/Shadow tab, pick a shape for After Status (incomplete) shape.

  3. Optionally, change the After Status (incomplete) fill color  and fill pattern.


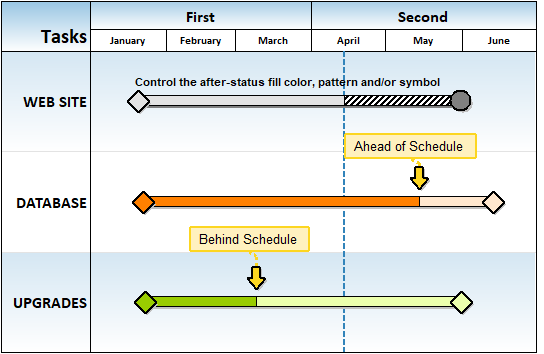
Change the bar color and pattern after the status date

Customize toolbox bar to change color and fill pattern after status:
  1. Double-click a bar in the toolbox.

  2. Pick a color for After Status (incomplete).

  3. Pick a Pattern

  4. Optionally, add a Target color (when using Special Effects)


Use a status symbol to adjust a task's progress

Set up a status symbol in the toolbox:
  1. Double-click a symbol in the toolbox.  (by default, the right-most symbol on the 16th row is used)

  2. For Usage Type pick Status Symbol.

  3. On the Text/Date Properties tab, choose Hide for Date Placement.

 Learn more


Show a percent complete pie symbol as a status symbol

Add a % complete symbol to the toolbox:
  1. Double-click a symbol in the toolbox.  (by default, the right-most symbol on the 16th row is used)

  2. For Usage Type pick Status Symbol.

  3. On the Text/Date Properties tab, choose Hide for Date Placement.

  4. Add the new status symbol to the bar.  Slide it to adjust status/percent complete. 


Show the percent complete for a task using a % SmartColumn

Add a % complete SmartColumn
  1. Click the arrow   next to Insert | Rows, Columns | New Column.
  2. Pick Percent Complete.
  3. Choose Insert Column.
  4. A new column will be inserted directly to the left or right of the column whose heading was clicked.  If on the left side of the schedule, the new column will appear to the left.  If on the right side of the schedule, the new column will appear to the right.


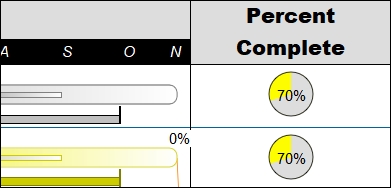
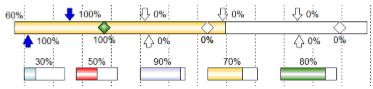
Change % complete for a task row

Click the arrow   next to Insert | Rows, Columns | New Column.

  1. Pick Percent Complete.
  2. Choose Insert Column.
  3. A new column will be inserted directly to the left or right of the column whose heading was clicked.  If on the left side of the schedule, the new column will appear to the left.  If on the right side of the schedule, the new column will appear to the right.


Set the % complete for multiple tasks on a row


Status can be changed for an entire schedule or for individual tasks. Individual tasks can be adjusted to reflect whether they are on schedule, behind schedule, or ahead of schedule.

Additionally, if multiple tasks are being shown on a single Milestones Professional row, the % complete can be set separately for each task.

Set the % complete for a symbol
  1. Use  (the toolbox Arrow tool.)

  2. Click the symbol.  If setting the % for a bar, click the start of the bar (left-most symbol.)

  3. The toolbar changes to Selection with Current Object: Symbol.  Click the small Size/Color tab.

  4. In the Override Symbol and Bar Colors section, choose a % setting for 1st Bar Fill %.

Set "split duration" for accurate SmartColumns

When setting the % complete for individual symbols and bars on a schedule it is important to turn on "split duration."

  1. On the Layout tab, in the Other section, click Duration Settings.  

  2.   Split Duration Across Bars...


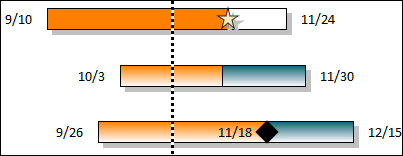
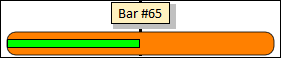
Show a bar with a % complete "thermometer"

Customize toolbox bar
  1. Double-click a bar in the toolbox.

  2. Pick one of the bar types shown here.

  3. Optionally pick an after status color.  For bar types 13, 14, 16, 34 and 35 the after status color shades the portion after the status date while for bar types 65 and 72 the color is used for the percent complete portion.


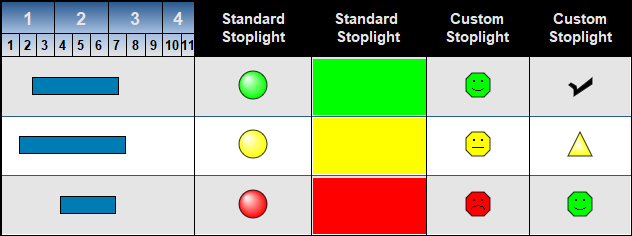
Show red-green-yellow stoplights for status

Milestones' Stoplight SmartColumn offers two basic methods for displaying stoplight symbols, text and colors based on user-entered numbers 1 to 4, or 1 to 10.

    • Standard Stoplights: Built-in stoplights appear based on user-enter numbers (1 = green, 2 = yellow, 3 = red, 4 = blue). G, Y, R, and B can appear with the stoplights. Optionally, display color-fills instead of the stoplights.

    • Custom Stoplights: Assign numbers 1 through 10 to any symbol, color and optional text. Optionally, display color-fills instead of the stoplights.

Learn more about Stoplight SmartColumns.


Related Topics

  1. Create, add and adjust a status symbol
  2. Fill_symbols_bars_to_status_date
  3. Status Date SmartColumn
  4. Create a Percent Complete SmartColumn
  5. Percent Complete Gridlines
  6. Summary Bars - Summary bar status fill control
  7. Display the status line


Guided Help Home


The fast easy way to schedule your projects:  Milestones Software by KIDASA Software, Inc. www.kidasa.com

Copyright © 2025 KIDASA Software, Inc. All rights reserved.