Master schedules
|
A Milestones Professional master schedule is a compilation of separate Milestones Professional schedules (sub-schedules). Usually, the sub-schedules are each maintained by different people or departments, each responsible for one or more projects. Thus, the master schedule gives a view of all projects. See: Tutorial Lesson 10 - Master Schedules Changes to data in the sub-schedules appear in the master schedule. Any changes to the master schedule will not appear in the sub-schedules. Contents Example: Master schedulesIn this example, schedules for Project One, Project Two, and Project Three are each maintained by different managers. The manager overseeing the progress of all three projects sets up a master schedule which merges the three files into a single file. When he needs to see the latest status on all three projects, he simply updates the master schedule with the latest data from Projects One Two and Three Three Milestones schedules......merged into a single Milestones master schedule.
Tips and considerations regarding master schedules:The typical use of a master schedule is to see the progress of selected projects in a single Milestones Professional file. All sub-schedules should have the same format, especially column types and locations (exceptions are discussed in Common Questions section below). Create a template or blank chart to meet this need. If changes are made to a master schedule, those changes are not retained when it is updated with the latest sub-schedule data. All sub-schedules should follow an agreed-upon hierarchy when displaying various levels of detail. Even agreeing on the names of the various project stages is a good idea. For example, in all sub-schedules, level 1 could be the project name; level 2 as the phase level (e.g. "Research," "Development," "Production," "Testing," "Delivery"); level 3 as the task level (e.g. under "Testing" phase..."Beta Product 1," "Beta 2," "Beta 3"). If the master schedule is to contain a single summary row for all merged projects, then all sub-schedules need to begin at outline level 2. This allows for an outline level 1 roll-up summary of all projects in the master schedule. Sub-schedules should be saved in a static location, such as a network folder, to ensure the master schedule has access to the latest sub-schedules' data. As always, be sure to frequently back-up these files. Create a master schedule:Master schedules are easy to set up. Simply select Milestones files (sub-schedules) in the order they should be merged.
Create and distribute a template or blank chart to be used for all sub-schedules and the master schedule:By creating a schedule template or blank chart, and using it for all sub-schedules and the master schedule, the format is consistent and ensures that sub-schedules will merge successfully into the master schedule. Distribute a copy of the template or blank chart to each person entering project data into his sub-schedule. Why is a common format so important? If one sub-schedule contains columns of duration values, percents complete, and end dates; and another sub-schedule contains columns of baseline dates and task names; then the master schedule will not know which columns to display. Thus, all schedules should have columns of the same format and placement. After each person populates his sub-schedule, it's recommended that the schedule is saved to a shared network folder and that the name of the sub-schedule is passed along to the keeper of the master schedule. When designing the format of the schedule, focus especially on these areas:
To distribute a template for use as sub-schedule:
To distribute a chart for use as sub-schedules:
Master schedules can be automatically updated when they are opened, or an update can be forced on an opened master schedule. Update a master schedule:Automatically update a master schedule when opened:
Update a master schedule that is already open:
Move a master schedule:
Common questions:In my sub-schedule, I want to track additional column data, not included in the master schedule merge. Can I do this? Yes. Just be sure to add the additional columns to the far left or far right, outside the standard columns which will be merged into the master schedule. The master schedule will ignore those extra columns in the sub-schedules. My master schedule serves as a "Friday Report" to management. How can I keep a historical record of each week's report? Each week, save the schedule under a new name, for example "Projects Report 11 March 03.MLP". Then choose File | Master Schedule and un-check Treat the Current Schedule as a Master Schedule. That way, the original master schedule will be updated, yet the newly named "historical" schedule for that week will not be updated. Now that we have distributed the schedule format, we want to change the format. How can we do that? Save the new format as a template. Have each person apply that template to his current sub-schedule. But first, have them back-up the schedule in case the template makes unwanted changes to the schedule. This can only be done if the template changes are minor. For example, extensive column properties and column ordering changes which are saved in the new template and then applied to an existing schedule may have adverse effects on the existing schedule. In another example, if the template changes are made to the toolbox symbology, this new template can be applied to the sub-schedules without adversely affecting the schedule data.
|
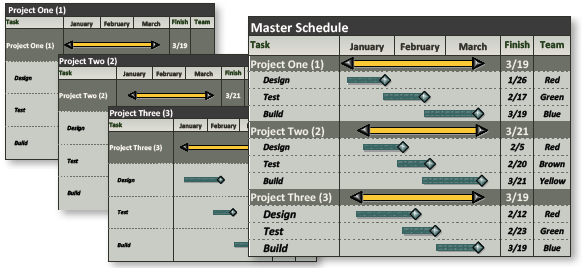

 Sub-schedules will fill the master schedule in the order shown in the
  .
.